Start working out at home - Today with pushups!
After we go over the 4 easy steps; we will give you 3 options for how to practice your pushups during your week.
Step 1: Find the level of your pushups
First, you are going to determine which level of pushups make sense for you. Or in other words elevation:
- elevate your hands*
- both hands and feet on the floor
- hands on the floor and elevate your feet*
In regards to the elevation of your hands or feet, basically:
- The higher your hands the easier. You could start off using a wall or countertop (if needed).
- When it comes to elevating your feet, the higher the feet the more difficult.
A word of caution, if it requires a maximum effort to complete your repetition(s), you are doing it wrong. Instead, your goal is repeatable reps.
Most importantly, be safe. And make sure whatever you use for elevation is stout and secure (it won’t move & you won’t fall).
Step 2: Work on form
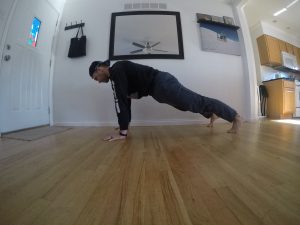
Because your starting position sets your movement up for success, it is important to put emphasis on it. For your pushups your starting position is the “top” of the pushup.
Important details for set up at top position are:
- Hands slightly outside your chest
- Hips and torso create a solid line (not a saggy line or caret symbol)
- Feet and hands have solid connection to the surface they are in contact with
- Head points down; eyes gaze 6” – 10” in front of hands

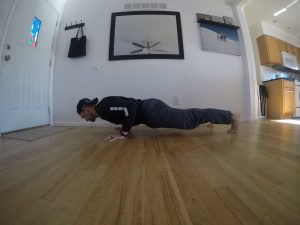
The simplicity of the movement is, you lower your body down, slightly pause, then press back up.
Specifically, the finer details of the movement are:
- Entire body moves together as one unit
- Elbows tuck in towards torso/ribs (not flare out)
- Chest (not face) lowers between hands
- Hands push down and slightly rotate externally (think screwing the lid off a jar)
- Feet push down hard (think – someone is trying to lift your foot up and you resist)

Step 3: Generate tension
Tension is important because it can keep your movements safe; keep your form honest; & allow you to ratchet up the difficulty level as needed.
- An example of tension keeping your movement safe is, tension in your glutes and mid-section protects your lower back.
- How tension can keep your form honest, is if you have proper tension in your hands along with the external torque, you will prevent your elbows from flaring out.
- Finally adding extra tension can allow you to self regulate more difficulty as needed to the movement.
Where/how to add tension:
- Butt – Squeeze your glutes tight (as if someone is going to punch your butt)
- Back – Think of actively pulling (like a back row) your body down and storing up spring like tension in your back which you “release” on your way back up!
- Midsection – brace as if a toddler was going to kick you in your stomach
- Hands & feet – think of pressurizing your hand and feet at their points of contact (review movement hand and feet instructions)
Step 4: Improve control
Don’t worry about being perfect, just be safe and practice. But as you practice more – work on making it better and better. It can help to slow your movement down at times. This is because going too fast can allow momentum to hide gaps in your strength and leaks of your energy.
Because it is difficult to internally evaluate how your own form looks, set up a camera (or your smartphone) and record yourself. Again, you are not looking for perfection. You are looking first to see if your form is safe:
- Is your lower back protected and not a sagging mess?
- Do your elbows stay close to your sides?
- If you are using something to elevate does it and you look secure?
Then ask yourself, what could I do better?
Now that you know how to practice your pushups; how should you practice them during your week?
How to practice (weekly):
Beginner: Practice a little every day.
Find ways to sneak in your one good rep several times throughout the day. Maybe every time you go for a drink of water during working hours; or every time you change the channel on the television. Some days you’ll only get 2 reps, some days will be 12 reps.
As you gain ability and confidence, look to add more reps or advance to the intermediate practitioner.
Intermediate: 3 days of strength practice.
For the intermediate level you will practice sets of 3 or 5 repetitions. In the beginning start with 3 sets and work your way up to 5 sets. Do this 3 days of your week. Remember you aren’t looking for a max effort. Your difficulty level aim is a moderate ability level for you that you are able to repeat.
Advanced: Add some challenge on top of 3 days of strength.
Practice the 3 days of strength as the intermediate does; plus add 1 sometimes 2 days that you can challenge yourself at a more difficult level. You are still not maxing out. Take several minutes break between your sets. You want to give yourself a chance to practice 1 or 2 solid reps at a slightly more difficult level than you are practicing on your other days.
That’s it. Enjoy.
Want to partner up and take your fitness to the next level? Email to see if you’d be a good fit for the program: robertthebrinkley@gmail.com
Don’t miss out – Subscribe to our newsletter *click*